Musings on Alternative Process Photography, History, Art, Culture, and Life in the Pre-Apocalypse
Tuesday, November 26, 2013
First tintype attempts with strobe- Yah!
That's Bryan Wing, a friend and collaborator. We have been making plans for a portrait project shooting folks who participate in competitive bearding!
I'm ridiculously happy about this. I had been working on getting a continuous-light setup going, figuring strobes would be more hassle. But with this one shoot, I'm hooked! One BIG massive pop from that strobe head and all the issues about long exposures (including having to explain to my sitter why they have to sit still... the anxiety that creates for them!). Sharp, clear details where it is sharp, and liquid melted light in back. Gorgeous!
Another from the same session this Saturday, Ross Faircloth-
Tuesday, November 12, 2013
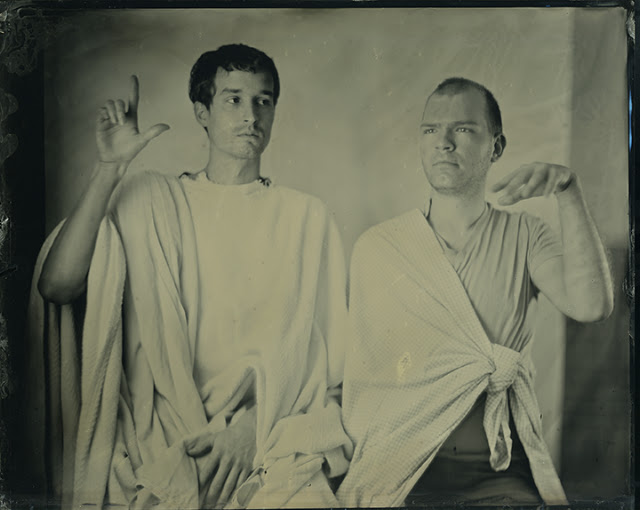
More portraiture of students
I just did three days of in-class tintype demos with my students. The assignment was for them to come up with a concept for a double-portrait. Some nice results, and I got to work out some of the kinks in my portrait setup. It's coming along nicely.

Amber Tipton and Maria Orrosetia
Sara Poyfair and Olivia Themudo
Priscilla Ruiz and Westley Harwart

Charity Roberts and Hayley Norwood
Malana Choi (in drag) and Heather Van der Dys
Saturday, November 9, 2013
DIY Headstand for portraits
In my constant quest to come up with functional wet-plate equipment that I can make cheaply, I end up doing a lot of design on the fly. My latest invention is a pretty sweet little headstand.
First off, I got a cymbal stand from a local music shop. Cymbal stands are pretty sturdy, have nice big rubber feet to keep them in place, and a low center of gravity. Here is the one I started with, which has a boom arm that doesn't show in this image because it is hidden in the upright tube. Here is a link to the actual stand, it costs about $50, and is one of the bottom-end models.

A lag shield that was just small enough to fit into the tube seen above. A lag shield is basically like a metal version of a sheetrock anchor, it's made for holding big lag screws.
Next, I took the very top portion of the cymbal stand off -
The threaded part on the top is a standard 5/16" thread, a bit too thick to go into the lag shield, so I used a drill bit to make the inside wider-
Then the threaded part of the cymbal stand fit right in. I slipped the lag shield into the tube of the neck-rest until the end of it is flush, then screwed so the threads right into the lag shield, spreading the two halves of it until it's snug.
First off, I got a cymbal stand from a local music shop. Cymbal stands are pretty sturdy, have nice big rubber feet to keep them in place, and a low center of gravity. Here is the one I started with, which has a boom arm that doesn't show in this image because it is hidden in the upright tube. Here is a link to the actual stand, it costs about $50, and is one of the bottom-end models.
I also got a the cheapest little guitar stand available- it costs $13 and you can see it here.
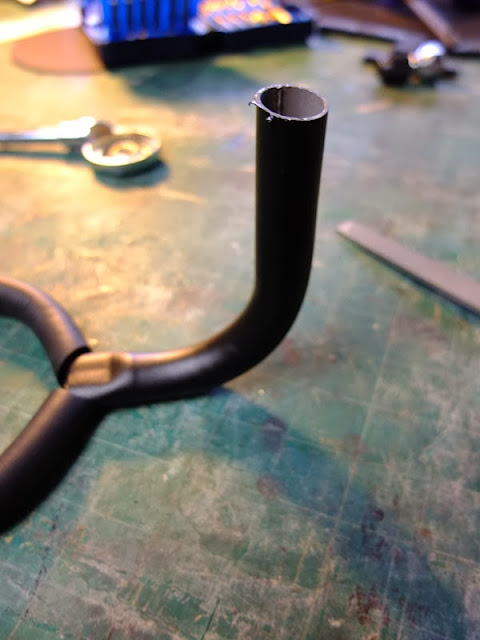
The top part of this little stand has a nice padded foam pad on it, with plastic caps. It can also be pretty easily bent, so the forks can be spread apart a bit. It's made to hold a guitar neck, but a human neck is a bit wider of course.
This has been the hardest part for me to find! Something that can cradle the back of the head, comfortably. I've been keeping an eye out for sanything that has this shape and the padding- and I found this while exploring at the music store.
The shaft is way too long, so I clamped it to my workbench and cut off most of it using a hacksaw. It's not very thick or very hard metal, so that was easy. Here it is before I filed down the end-

I took this to my local orange-themed big box hardware store I found one of these lovely items-
Next, I took the very top portion of the cymbal stand off -
The threaded part on the top is a standard 5/16" thread, a bit too thick to go into the lag shield, so I used a drill bit to make the inside wider-
Then the threaded part of the cymbal stand fit right in. I slipped the lag shield into the tube of the neck-rest until the end of it is flush, then screwed so the threads right into the lag shield, spreading the two halves of it until it's snug.
When it's all in there, I put the top portion of the cymbal stand back on and it looks like this-
And here's how it looks with the boom arm out, holding a person in place. The black thing on the stand is a ten-pound ankle weight I got at Target- 2 for $25.
This seems to be a real solution! I'll be testing it out next week to make sure.
I do love the challenge of trying to piece together something from numerous sources, and having it work out this well!! My portrait operation is really coming together.
I made two of these- so, $50 for the stand, $13 for the brace, $2 for the lag shield and $12.50 for the weight- a grand total of around $75-$80. They have a nice heft to them and with the padded brace, it's actually quite comfortable and keeps those eyes in focus!
Labels:
DIY
Subscribe to:
Comments (Atom)


.jpg)